

Concrete floors often crack, sink, and crumble over time. What...
Read MoreHow to Cut Slate Tile: Expert Tips By Stone Sealer
Welcome to our comprehensive guide on how to cut slate tile, brought to you by Stone Sealer & Restoration. Slate tiles are renowned for their natural beauty and durability, making them a popular choice for both indoor and outdoor spaces.
However, cutting slate tiles can be a daunting task for many DIY enthusiasts and professionals alike. In this article, we will walk you through the essential steps, tools, and techniques to ensure you achieve clean and accurate cuts, enhancing the overall appeal of your slate tile project.
Tools and Materials You'll Need : Guide On How to Cut Slate Tile
Before you start cutting slate tile, it’s important to gather all the necessary tools and materials to ensure a smooth and successful cutting process. Here’s a list of what you’ll need:
Wet Saw
A wet saw equipped with a diamond-tipped blade is crucial for making precise cuts on slate tile. The water-cooling system minimizes friction and dust.
Chisel and Hammer
For straight cuts, you’ll require a chisel and hammer. The chisel is used to score the tile along the desired cut line, and the hammer is gently tapped to split the tile along the scored line.
Snap Cutter
A snap cutter is ideal for making straight cuts on thin slate tiles. It works by scoring the tile and then applying pressure to snap it along the scored line.
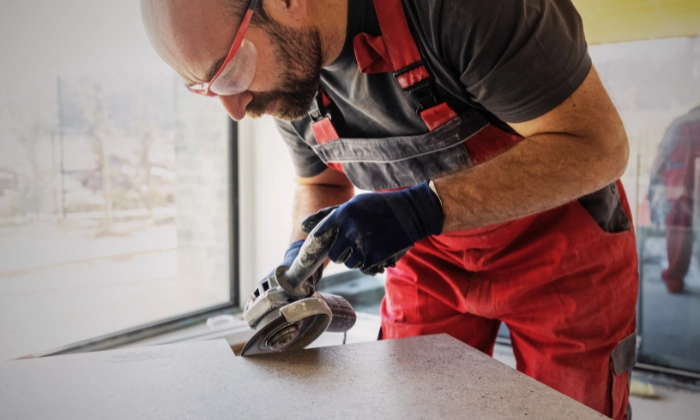
Angle Grinder
An angle grinder with a diamond blade is essential for making irregular cuts and curves on slate tile. This tool requires precision and careful handling.
Safety Gear
Ensure you have safety goggles, gloves, a dust mask, and appropriate clothing to protect yourself from potential injuries and dust hazards.
Measuring Tools
Accurate measurements are crucial. Have a measuring tape, straight edge, and pencil to mark the cut lines on the slate tile.
Slate Tiles
High-quality slate tiles in the desired size and thickness for your project.
Gathering these tools and materials beforehand will set you up for a successful slate tile cutting experience. Always prioritize safety and precision while working with these tools.
“If you’re working on a project at home and you’re using slate, you may need to cut it to fit it into different spaces. To cut slate, you’ll need to mark the slate so that you have a line to cut across. Then, you’ll need to use a chisel and hammer, handheld slate cutters, or a power saw to cut it. If you use the correct tools and take your time, you can cut straight and precise lines with a little practice”.(said by wikiHow)
Safety Precautions to Keep in Mind
Working with slate tile involves the use of sharp tools and potential dust hazards. To ensure your safety and the success of your project, it’s essential to follow these safety precautions:
Wear Safety Gear
Put on safety goggles to protect your eyes from flying debris. Wear gloves to safeguard your hands and a dust mask to prevent inhaling dust particles.
Protective Clothing
Wear appropriate clothing, such as long sleeves and pants, to prevent skin contact with sharp edges and dust.
Work in a Well-Ventilated Area
If you’re working indoors, make sure the area is well-ventilated to help disperse any dust that may be generated during the cutting process.
Use Ear Protection
Some cutting tools can be loud, so consider using ear protection to prevent potential hearing damage.
Read Tool Manuals
Familiarize yourself with the operation and safety guidelines of each tool you’ll be using. Follow the manufacturer’s instructions closely.
Maintain a Clean Workspace
Keep your work area tidy by removing debris and excess dust. A clean workspace reduces the risk of accidents.
Work Methodically
Take your time and work methodically to avoid rushing, which can lead to mistakes and accidents.
Stay Focused
Pay close attention while using sharp tools. Distractions can increase the risk of accidents.
Keep Hands Clear
Always keep your hands and fingers clear of the cutting path. Use clamps or other tools to hold the slate tile securely.
Proper Tool Handling
Handle tools with care, especially when changing blades or making adjustments. Disconnect power sources when not in use.
Dispose of Dust Properly
Collect dust in a dust bag or use a vacuum with a dust collection attachment. Dispose of dust safely according to local regulations.
Stay Hydrated
Working with tools can be physically demanding. Remember to stay hydrated throughout the process.
By following these safety precautions, you’ll minimize the risks associated with cutting slate tile and ensure a safe and successful DIY project. Your well-being is of utmost importance, so prioritize safety at all times.
Methods for Cutting Slate Tile
Using a Wet Saw
A wet saw is a versatile tool that allows you to make precise cuts on slate tile. It employs a diamond-tipped blade and a water-cooling system to minimize friction and dust.
Employing a Chisel and Hammer
This method is suitable for straight cuts and requires patience and precision. Use a chisel to score the tile along the cut line and then gently tap it with a hammer to split it.
Using a Snap Cutter
Snap cutters are handy for straight cuts on thin slate tiles. They work by scoring the tile and then applying pressure to snap it along the scored line.
Angle Grinder for Irregular Cuts
Angle grinders equipped with diamond blades are ideal for making curved and irregular cuts on slate tile. This method requires steady hands and attention to detail.
Preparing Slate Tile for Cutting
Cleaning and Measuring
Before cutting, ensure your slate tiles are clean and free from debris. Measure and mark the tile’s surface accurately to guide your cuts.
Marking the Cut Lines
Use a straightedge and a pencil to mark the cut lines on the slate tile. Double-check your measurements to avoid errors.
Step-by-Step Cutting Process
Wet Saw Cutting Steps
- Set up the wet saw according to the manufacturer’s instructions.
- Adjust the fence and blade depth to match your cut requirements.
- Slowly feed the tile into the blade, following your marked lines.
- Allow the water to cool the blade and prevent overheating.
Chisel and Hammer Technique
- Score the tile along the marked line using a chisel.
- Place the chisel along the scored line and gently tap with a hammer.
- The tile should split along the scored line with careful tapping.
Snap Cutter Instructions
- Score the tile along the marked line using the snap cutter.
- Apply pressure to the sides of the tile, snapping it along the scored line.
Angle Grinder Cutting Steps
- Secure the tile and put on safety gear.
- Gently maneuver the angle grinder along the marked line.
- Make small cuts and gradually deepen them until the tile splits.

Tips for Achieving Clean Cuts
Achieving clean and precise cuts when working with slate tile requires careful technique and attention to detail. Here are some tips to help you achieve the best results:
Sharp Tools
Ensure your cutting tools, whether it’s a wet saw, chisel, or angle grinder, are sharp and in optimal condition. Dull tools can result in jagged edges and uneven cuts.
Steady Hand
Keep a steady hand while cutting to maintain a straight and accurate line. Slow and controlled movements will yield better results.
Practice on Scrap Tile: If you’re new to cutting slate tile, practice on a scrap piece first. This will help you get a feel for the tools and techniques before working on your actual project.
Use a Guide
For straight cuts, use a straight edge or guide to ensure your cut line remains consistent and accurate.
Score Before Cutting
When using a chisel and hammer, score the tile along the cut line before attempting to split it. This will help prevent the tile from cracking in unintended directions.
Gradual Cuts
When using an angle grinder for irregular cuts, make gradual and controlled cuts to shape the tile accurately.
Secure the Tile:
Use clamps or other methods to secure the slate tile in place while cutting. This will prevent the tile from shifting and causing uneven cuts.
Go Slow
Avoid rushing the cutting process. Slow, deliberate movements will help you maintain control and achieve cleaner cuts.
Check Measurements Twice
Double-check your measurements and markings before making any cuts to avoid errors that can’t be undone.
Keep the Blade Cool
If you’re using a wet saw or angle grinder, ensure the blade remains cool by following the manufacturer’s guidelines. Overheating can affect the quality of the cut.
Finish the Cut
When using a snap cutter, ensure you apply enough pressure to fully snap the tile along the scored line. Incomplete snaps can result in rough edges.
Clean the Blade
Dust and debris can accumulate on the cutting blade, affecting its performance. Regularly clean the blade to ensure smooth and accurate cuts.
Experiment with Pressure
Different tools may require varying levels of pressure for optimal results. Experiment with light to moderate pressure to find what works best for your tools and slate tile.
Maintain Focus
Avoid distractions while cutting. Focusing on the task at hand will help you maintain precision throughout the process.
By applying these tips and techniques, you’ll increase your chances of achieving clean and professional-looking cuts on your slate tile project. Remember that practice makes perfect, so don’t hesitate to refine your technique as you gain experience.
Dealing with Curved Cuts and Odd Shapes
For curved cuts or irregular shapes, an angle grinder with a diamond blade is your best bet. Take your time and make incremental cuts to achieve the desired shape.
Installing Slate Tile
Slate Tile Flooring
As Stone Sealer provides guidance for all types of stone restoration, they also provide tips for installing slate tile flooring that can enhance the aesthetics of any space while adding a touch of natural elegance. However, proper installation is key to ensuring a durable and visually pleasing result. Here’s a step-by-step guide to help you successfully install slate tile flooring:
Prepare the Subfloor: Before you begin, ensure that the subfloor is clean, dry, and level. Any unevenness in the subfloor can lead to problems later on.
Lay Out the Tiles: Lay out the slate tiles in the desired pattern before applying mortar. This will allow you to make any adjustments and ensure a cohesive design.
Mix the Thin-Set Mortar: Follow the manufacturer’s instructions to mix the thin-set mortar. Consistency is crucial; the mortar should have the texture of a creamy peanut butter.
Apply Mortar: Using a notched trowel, spread a thin layer of mortar onto a small section of the subfloor. Work in small areas to prevent the mortar from drying before you lay the tiles.
Place the Tiles: Gently press each slate tile into the mortar, twisting it slightly to ensure proper adhesion. Use tile spacers to maintain consistent grout lines.
Check for Level: Use a level to ensure that each tile is level with the adjacent ones. Adjust the mortar as needed to achieve a uniform surface.
Continue Tiling: Work your way across the room, applying mortar and placing tiles. Remember to periodically check for level and alignment.
Cut Tiles for Edges: As you reach the edges of the room, you’ll likely need to cut tiles to fit. Measure and mark the tiles before using your chosen cutting method to achieve accurate cuts.
Allow Mortar to Set: Let the mortar set for the time specified by the manufacturer. This typically ranges from 24 to 48 hours.
Prepare for Grouting: Once the mortar has cured, remove the tile spacers and clean any excess mortar from the tile surfaces.
Mix Grout: Mix the grout according to the manufacturer’s instructions. Ensure it has a consistency similar to toothpaste.
Apply Grout: Use a rubber float to apply the grout, pressing it into the spaces between the tiles. Work at a diagonal angle to ensure full coverage.
Wipe Excess Grout: After about 15-20 minutes, when the grout begins to set, use a damp sponge to wipe away excess grout from the tile surfaces. Rinse the sponge frequently.
Final Cleanup: Once the grout has fully cured, buff away any remaining haze from the tiles using a clean, dry cloth.
Seal the Tiles: To protect the slate tiles from stains and moisture, apply a suitable slate sealer according to the manufacturer’s instructions.
Enjoy Your New Flooring: Once the sealer has dried, your slate tile flooring is ready to be enjoyed. It’s not only visually appealing but also highly durable.
Slate Tile Roof
Slate tile roofing is a classic and elegant choice that offers both durability and timeless beauty. Proper installation is crucial to ensure your roof not only looks stunning but also provides effective protection against the elements. Here’s a step-by-step guide to help you successfully install slate tile roofing:
Prepare the Roof Structure: Ensure that the roof structure is sound and able to support the weight of the slate tiles. Make any necessary repairs or reinforcements before proceeding.
Install Underlayment: Lay down a high-quality roofing underlayment to provide an extra layer of protection against water infiltration.
Mark Guideline Rows: Begin by marking guideline rows along the bottom of the roof. These rows will guide the placement of the first slate tiles.
Attach Starter Tiles: Attach starter tiles along the guideline rows using nails or hooks. These tiles provide a secure base for the rest of the roofing.
Overlapping Tiles: As you work your way up the roof, overlap each row of slate tiles. This overlapping pattern ensures effective water shedding and prevents leaks.
Nail Placement: When nailing slate tiles, use copper or stainless steel nails. Place the nails in the upper corners of the tiles, and avoid nailing through the surface of the tile, as this can compromise its integrity.
Maintain Consistent Offset: Maintain a consistent offset between each row of tiles to create a visually pleasing and structurally sound roof.
Cutting for Vents and Protrusions: As you encounter vents, chimneys, and other protrusions, use a chisel or angle grinder to carefully shape the slate tiles to fit around these obstacles.
Inspect and Maintain: Regularly inspect the roof to ensure that all tiles are securely in place and that there are no signs of damage or shifting. Make any necessary repairs promptly.
Seal the Roof: Consider applying a suitable slate tile roof sealer to enhance the roof’s waterproofing and prolong its lifespan.
Regular Maintenance: Over time, some tiles may loosen or crack due to weather and wear. Regularly check and replace any damaged tiles to maintain the roof’s integrity.
Professional Help: If slate tile roofing installation seems overwhelming, don’t hesitate to seek professional help. Proper installation requires expertise to ensure the roof’s long-term performance.
Slate Tile Bathroom
Slate tile can transform your bathroom into a stylish oasis, bringing the beauty of natural stone indoors. Whether you’re looking to create a serene spa-like atmosphere or a rustic charm, here’s a step-by-step guide to help you successfully install slate tile in your bathroom:
Prep the Surface: Remove any existing tiles, ensuring the surface is clean, dry, and free of debris. Repair any imperfections in the walls or floor to ensure a smooth installation.
Plan the Layout: Plan the layout of your slate tiles, considering the placement of fixtures, corners, and edges. Dry-fit the tiles to ensure they fit well within the space.
Mix the Mortar: Prepare the thin-set mortar according to the manufacturer’s instructions. Consistency is key; it should be easy to spread but not runny.
Apply Mortar: Using a notched trowel, apply mortar to a small area of the wall or floor. Press the slate tile firmly into the mortar, giving it a slight twist to secure adhesion.
Maintain Spacing: Use tile spacers to maintain consistent spacing between tiles. This will ensure even grout lines and a professional finish.
Cutting and Trimming: As you reach corners, edges, or fixtures, by our tile edge trim solutions measure and cut the slate tiles to fit. Use an edge visualizer and a wet saw or angle grinder for precision cuts.
Check Alignment: Regularly use a level to ensure that your tiles are properly aligned and even. Adjust as needed to maintain a neat appearance.
Grouting: Once the mortar has dried, mix the grout to a toothpaste-like consistency. Use a rubber float to apply grout, pressing it into the spaces between tiles.
Clean Excess Grout: After about 15-20 minutes, wipe away excess grout from the tile surfaces using a damp sponge. Rinse the sponge frequently to avoid smearing.
Finishing Touches: After the grout has cured, buff away any remaining grout haze from the tiles using a clean, dry cloth.
Seal the Tiles: Apply a suitable slate tile sealer to protect the tiles from moisture and stains. Follow the manufacturer’s instructions for application.
Install Fixtures: Once the sealer has dried, you can reinstall bathroom fixtures like faucets, showerheads, and towel racks.
Enjoy Your New Bathroom: Step back and admire your newly tiled bathroom. The natural beauty of slate tile can instantly elevate the ambiance of the space.
Regular Maintenance: Keep your slate tile bathroom clean by using a mild detergent and a soft brush. Avoid abrasive cleaners that can damage the tiles.
Outdoor Slate Tile
Slate tile isn’t limited to indoor spaces; it can also bring a touch of elegance and natural beauty to your outdoor areas. Whether you’re considering a patio, walkway, or other outdoor project, here’s a step-by-step guide to help you successfully install slate tiles outdoors:
Prepare the Ground: Ensure the ground is level, compacted, and properly graded to prevent water pooling. Remove any vegetation or debris from the area.
Create a Solid Base: Lay down a sturdy foundation for your slate tiles, such as a concrete slab or compacted gravel base. This will provide stability and prevent tiles from sinking over time.
Plan the Layout: Plan the layout of your slate tiles, taking into account any patterns, curves, or edges. Dry-fit the tiles to ensure they fit well within the designated area.
Mix the Mortar: Prepare the mortar according to the manufacturer’s instructions. Use mortar suitable for outdoor use, as it needs to withstand weather conditions.
Apply Mortar: Using a trowel, apply a layer of mortar to a small section of the base. Press the slate tiles into the mortar, ensuring they are level and properly spaced.
Maintain Spacing: Use tile spacers to maintain even spacing between the tiles. This will allow for proper drainage and prevent water from accumulating.
Cutting and Shaping: As you approach edges or irregular areas, measure and cut the slate tiles to fit. Use an angle grinder or chisel for accurate cuts.
Check Alignment: Regularly use a level to ensure that the tiles are aligned and level. Adjust as needed to achieve a visually pleasing result.
Grouting: Once the mortar has dried, mix outdoor-rated grout according to the manufacturer’s instructions. Apply the grout after grout cleaning, using a rubber float, pressing it into the gaps.
Clean Excess Grout: After a short curing period, use a damp sponge to wipe away excess grout from the tile surfaces. Rinse the sponge frequently to avoid smearing.
Finishing and Sealing: Allow the grout to fully cure before applying an outdoor slate tile sealer. This will protect the tiles from the elements and enhance their longevity.
Enjoy Your Outdoor Space: Once the sealer has dried, your outdoor slate tile project is complete. Now you can relax and enjoy your beautifully tiled outdoor area.
Regular Maintenance: Periodically clean the slate tiles with a mild detergent and water to maintain their appearance. Reapply sealer as needed to ensure continued protection.
Maintaining and Sealing Slate Tile
Proper maintenance and sealing are essential to keep your slate tile looking its best and maintaining its durability over time. Here’s a guide to help you effectively maintain and seal your slate tile surfaces:
Regular Cleaning: Regularly clean your slate tile surfaces using a mild detergent and water solution. Gently scrub with a soft brush or mop to remove dirt, grime, and stains. Stone Sealer also provides guidance for marble stain removal.
Avoid Harsh Cleaners: Avoid using harsh chemicals, acidic cleaners, or abrasive materials that can damage the slate tile’s surface or strip away its natural finish.
Prevent Stains: Wipe up spills promptly to prevent staining. Slate is porous, so liquids can penetrate and leave marks if not cleaned promptly.
Avoid Standing Water: Prevent water from pooling on the slate tile surface, especially in outdoor areas. Proper drainage and grading can help avoid potential damage.
Protect High-Traffic Areas: Consider using mats or rugs in high-traffic areas to prevent excessive wear on the slate tile surface.
Regular Sealing: Depending on the type of slate and its location (indoors or outdoors), regular sealing may be necessary to protect the tiles from moisture and stains.
Choose the Right Sealer: Select a high-quality slate tile sealer that’s appropriate for your specific type of slate and its location. Contact us if you’re unsure.
Apply Sealer: Follow the manufacturer’s instructions to apply the sealer evenly across the slate tile surface. Use a clean cloth or sponge, and allow the sealer to penetrate.
Wipe Off Excess Sealer: After applying the sealer, wipe off any excess using a clean, dry cloth. Be thorough to prevent the sealer from leaving a hazy residue.
Allow Drying Time: Let the sealer dry completely according to the manufacturer’s recommendations before walking on or using the sealed area.
Reapply Sealer: Over time, the protective sealant may wear off. Reapply the sealer periodically as recommended by the manufacturer to maintain protection.
Regular Inspections: Periodically inspect your slate tile surfaces for signs of wear, damage, or areas that may need resealing. Address any issues promptly.
Professional Help: If you’re unsure about maintenance or sealing procedures, or if your slate tiles require restoration, consider seeking professional assistance.
Conclusion
Achieving precise slate tile cuts demands a careful approach, the utilization of suitable tools, and a comprehensive grasp of the procedure. By adhering to our comprehensive guide on how to cut slate tile, expertly prepared by Stone Sealer & Restoration, you will possess the necessary knowledge to confidently undertake slate tile cutting projects.
Safety must remain paramount, accompanied by the selection of the correct tools and the cultivation of patience, ensuring the realization of remarkable outcomes. Embrace the art of slate tile cutting using our provided guide, and may your tiling endeavors be both successful and gratifying!
FAQs (Frequently Asked Questions)
Here are some common questions that people often have about working with slate tile and its various applications:
Q: Is slate tile suitable for both indoor and outdoor use?
A: Yes, slate tile is versatile and can be used both indoors and outdoors. It’s commonly used for flooring, roofing, bathrooms, kitchens, patios, and walkways due to its durability and natural beauty.
Q: What tools do I need for cutting slate tile?
A: You’ll need tools such as a wet saw, chisel and hammer, snap cutter, and angle grinder for different types of cuts. Safety gear like goggles, gloves, and a dust mask is essential.
Q: Can I install slate tile on my own, or should I hire a professional?
A: While DIY installation is possible, it’s important to have some experience with tile installation. If you’re unsure, hiring a professional can ensure proper installation and save you time and potential mistakes.
Q: How do I prevent slate tile from cracking during installation?
A: Proper preparation of the subfloor or base, using the correct adhesive and mortar, and ensuring accurate cuts are crucial to preventing slate tile from cracking during installation.
Q: Do I need to seal the slate tile after installation?
A: Sealing slate tile is recommended, especially for high-moisture areas like bathrooms and outdoor spaces. Sealing helps protect the tiles from stains, moisture, and wear.
Q: How do I clean slate tile surfaces?
A: Regularly clean slate tile with a mild detergent and water solution. Avoid harsh chemicals or abrasive materials that can damage the surface.
Q: Can slate tile be used in a cold climate?
A: Yes, slate tile is durable and can withstand cold climates. However, proper installation and sealing are essential to prevent freezing and thawing cycles from damaging the tiles.
Q: Is slate tile environmentally friendly?
A: Slate is a natural stone, making it an eco-friendly choice. It’s sourced from the earth and requires minimal processing, reducing its environmental impact.
Q: Can slate tile be used around a fireplace?
A: Yes, slate tile is a great choice for fireplace surrounds and hearths due to its heat resistance. Ensure proper installation and consider sealing to protect against staining from soot and ash.
Q: How often should I reseal slate tile?
A: The frequency of resealing depends on factors like location and usage. Generally, it’s recommended to reseal slate tile every 1-3 years for optimal protection.
Our Services
Our Recent Post
What Does Etching On Marble Look Like
Marble may look strong and timeless, yet its appearance can...
Read More
How to Clean Concrete Floor | A Step-by-Step Guide for Sparkling Results
How to Clean Concrete Floor effectively is essential to maintaining...
Read More
How to Remove Paint from Concrete
How to Remove Paint from Concrete? Cleaning away paint layers...
Read More