

White and Gray Granite Countertops: Which is Suitable for You?...
Read MoreThe Ultimate Technique for Cutting Tile Around the Toilet
Embarking on a bathroom renovation journey? If you’re tackling the task of cutting tile around toilet, you’re in the right place. In this comprehensive guide brought to you by StoneSealerRestoration, we’ll walk you through the essential steps and expert techniques to achieve a flawless and professional finish. Let’s dive into the world of precision and transformation.
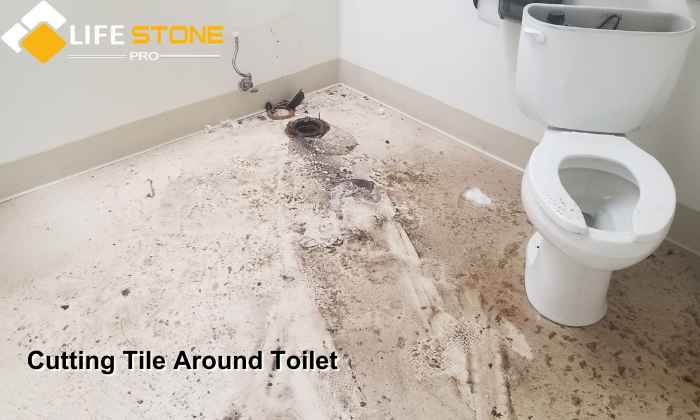
Why Is Tiling Around a Toilet Challenging?
Tiling around a toilet presents a unique set of challenges that many DIY enthusiasts and homeowners find daunting. Unlike traditional tiling projects on flat surfaces, such as kitchen backsplashes or bathroom walls, working around a toilet requires precision, careful planning, and an understanding of the specific obstacles involved. In this article, we will delve into the reasons why tiling around a toilet can be so challenging and provide you with valuable insights and techniques to tackle this task successfully. Whether you’re a seasoned DIYer or a novice, understanding these challenges is the first step toward achieving a professional-looking result in your bathroom.
Gathering Your Tools and Materials
Before embarking on the project of tiling around a toilet, it’s crucial to assemble the necessary tools and materials to ensure a smooth and efficient process. Here’s a comprehensive list of what you’ll need:
- Tile Cutter or Wet Saw: A tile cutter or wet saw is essential for precisely cutting tiles to fit around the toilet base and other obstacles in the bathroom.
- Safety Goggles and Gloves: Your safety should always be a priority. Wear safety goggles to protect your eyes from tile shards and gloves to safeguard your hands during the cutting and handling of tiles.
- Tape Measure: Accurate measurements are crucial in achieving a seamless look. A tape measure will help you measure and mark the tiles correctly.
- Pencil: You’ll need a pencil to mark the tiles for cutting and to make layout lines on the floor.
- Tile Adhesive: Select a high-quality tile adhesive that is appropriate for your tile type and substrate. The adhesive ensures the tiles adhere firmly to the floor.
- Grout and Grout Float: Grout is used to fill the gaps between tiles, providing stability and preventing moisture infiltration. A grout float is essential for applying grout evenly.
- Spirit Level: A spirit level helps you ensure that your tiles are laid perfectly level and flat, avoiding uneven surfaces.
- Tile Spacers: These small, plastic accessories are used to maintain consistent gaps between tiles, ensuring a professional finish.
- Sponge and Bucket: Keep a sponge and bucket handy for wiping away excess adhesive and grout as you work. This helps keep your tiles clean and prevents unwanted residue from drying on the surface.
- Wax Ring and Toilet Bolts: You’ll need a wax ring and toilet bolts to re-install the toilet securely after tiling is complete.
- Screwdriver: A screwdriver is required for removing and reattaching any toilet accessories or fixtures in your bathroom.
Safety Precautions
Working on a tiling project around a toilet requires a few safety precautions to protect yourself and your surroundings. Here’s what you should keep in mind:
- Safety Goggles and Gloves: Always wear safety goggles to shield your eyes from flying tile fragments, dust, and debris. Additionally, don gloves to safeguard your hands from sharp tile edges and chemicals used in the tiling process.
- Ventilation: Ensure your workspace is adequately ventilated, especially when working with tile adhesive and grout. Proper ventilation helps dissipate fumes and prevents you from inhaling potentially harmful substances.
Preparing the Area
Before you start tiling around the toilet, proper preparation of the workspace is crucial for a successful project. This involves a series of steps, including removing the toilet and ensuring accurate measurements.
Removing the Toilet
- Turn Off the Water Supply: Begin by turning off the water supply to the toilet. You’ll usually find a shut-off valve on the water line behind or beneath the toilet. Turn it clockwise until it’s fully closed to stop the water flow.
- Flush the Toilet: Flush the toilet to empty the tank and bowl. This will minimize the amount of water in the toilet, making it easier to handle during removal.
- Remove the Tank Lid: Lift off the tank lid and place it in a safe location to avoid any accidental damage.
- Disconnect the Water Supply Line: Use an adjustable wrench to disconnect the water supply line from the bottom of the tank. Be prepared for a small amount of water to spill when you do this, so have a towel or bucket ready to catch any drips.
- Remove the Toilet Bolts: There are typically two bolts securing the toilet to the floor. Remove the nuts from these bolts using a wrench or pliers. Once the nuts are off, you should be able to lift the toilet straight up. If it feels stuck, gently rock it side to side to break the seal between the wax ring and the floor.
- Cap the Sewer Pipe: To prevent sewer gases from escaping, cap the sewer pipe temporarily with a clean rag or a specially designed sewer cap. This is important for maintaining a pleasant and safe working environment.
Cleaning and Measuring
- Clean the Area: With the toilet removed, take the opportunity to thoroughly clean the floor area where the tiles will be installed. Remove any old adhesive, dirt, or debris. A clean surface ensures a better bond between the tiles and the floor.
- Measure the Toilet Flange to Wall Distance: Use a tape measure to accurately measure the distance from the center of the toilet flange (the opening where the waste pipe is located) to the nearest wall. Record this measurement as it will serve as a reference point for tile placement.
Choosing the Right Tiles
Selecting the right tiles is a pivotal step in ensuring a successful tiling project around your toilet. The tiles you choose should not only enhance the aesthetic appeal of your bathroom but also be practical and functional. In this section, we’ll discuss the various aspects of choosing the right tiles for this task.
Tile Types and Sizes
- Tile Material: Consider the material of the tiles. Common choices for bathroom floors include ceramic, porcelain, natural stone, and vinyl. Each material has its own unique characteristics, such as durability, maintenance requirements, and aesthetic appeal. Choose a material that suits your preferences and needs.
- Tile Size: When it comes to tile sizes, larger tiles are often preferred for spacious bathrooms as they create an open and seamless look. However, for tiling around a toilet, it’s advisable to opt for standard-sized tiles, typically 12×12 inches or 18×18 inches. These smaller sizes are easier to cut and manipulate to fit around the toilet base and other obstacles.
Matching Your Existing Tile
- Color and Style: If you’re tiling around a toilet as part of a larger bathroom renovation, aim to match the color and style of your existing tiles as closely as possible. This ensures a cohesive and harmonious look in your bathroom.
- Pattern and Design: Pay attention to the pattern and design of your existing tiles. If your current tiles have a specific pattern or texture, try to find replacement tiles that mimic these features. Matching the pattern is essential for a seamless appearance.
- Texture and Finish: Consider the texture and finish of your tiles, especially if you’re tiling a bathroom floor. Glossy tiles may be slippery when wet, so matte or textured finishes are often preferred for safety reasons. Ensure that the texture of your new tiles complements the existing ones.
- Grout Color: Don’t forget to take grout color into account. Grout can significantly impact the overall appearance of your tiled area. Choose a grout color that matches or complements your existing grout for a consistent look.
- Tile Thickness: Check the thickness of the tiles you’re considering. Tiles that are too thick may create uneven surfaces when transitioning from the tiled area to other flooring in the bathroom.
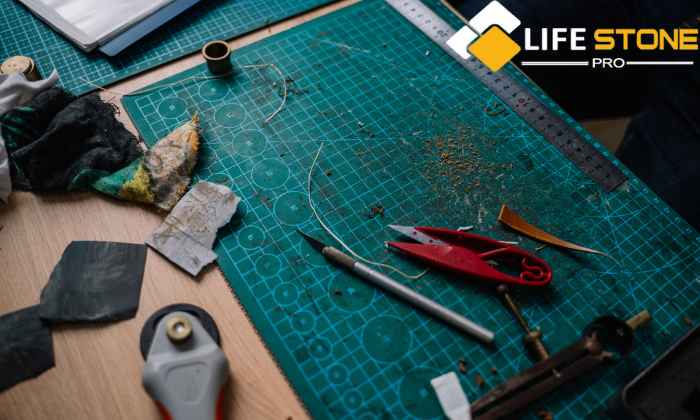
Cutting Tiles
Cutting tiles is a critical skill when tiling around a toilet, as it allows you to create precise fits and achieve a professional finish. In this section, we’ll explore the tools and techniques for cutting tiles effectively and efficiently.
Tile Cutters vs. Other Methods
Tile Cutters:
Tile cutters are specialized tools designed for cutting tiles cleanly and accurately. There are two main types of tile cutters: manual and electric.
- Manual Tile Cutters: These are hand-operated tools that use a scoring wheel to score the tile’s surface. Once scored, a gentle pressure applied to the handle snaps the tile along the scored line. Manual tile cutters are excellent for straight cuts and are relatively easy to use.
- Electric Tile Cutters: Electric tile cutters, such as wet saws, use a diamond-tipped blade and water cooling system to cut tiles smoothly. They are ideal for cutting through thick or dense tiles, as well as for making intricate cuts. Electric tile cutters are versatile but require some experience to use effectively.
Other Cutting Methods:
In addition to tile cutters, you can also consider these alternative methods for cutting tiles:
- Tile Nippers: Tile nippers are handheld tools that allow you to nibble away at the tile’s edge. They are useful for shaping and refining cuts, especially around curved edges or irregular shapes.
- Angle Grinder: An angle grinder fitted with a diamond-cutting wheel can be used for cutting tiles. This method is effective for making straight and curved cuts but requires caution and precision.
Cutting Techniques for Precision
When cutting tiles, precision is essential to ensure a seamless fit around your toilet. Here are some techniques to help you achieve precision:
- Measure Twice, Cut Once: Before making any cuts, measure the area carefully and mark the tiles where cuts are needed. Double-check your measurements to avoid costly mistakes.
- Use a Straight Edge: When making straight cuts, use a straight edge or a square to guide your tile cutter or other cutting tools. This helps maintain straight and clean cuts.
- Practice Safety: Always wear safety goggles and gloves when cutting tiles. The process can generate sharp shards, so safety gear is crucial.
- Control the Speed: If using an electric tile cutter, control the speed at which you feed the tile through the blade. Slow and steady movements often yield better results.
- Mark Cut Lines: Mark your cut lines on the tile’s surface using a pencil or marker. This ensures that you cut in the right place and minimizes errors.
- Test Cuts: If you’re new to tile cutting, practice on spare tiles or offcuts to get a feel for the tool and its cutting capabilities before working on the actual project.
- Smooth Edges: After making cuts, use a tile file or sandpaper to smooth any rough edges, ensuring a snug fit when placing the tiles.
Laying the Tiles
Now that you’ve successfully cut your tiles to fit around the toilet, it’s time to lay them in place. Proper tile installation is crucial for achieving a flawless and long-lasting result. In this section, we’ll guide you through the steps of setting a starting point and applying adhesive to securely place the tiles.
Setting a Starting Point
- Select Your Starting Point: Choose a starting point for laying the tiles that is both aesthetically pleasing and practical. Typically, this is a central point in the room or an area that draws the eye. In most cases, it’s best to start at the center of the room and work outward.
- Mark Your Layout Lines: Use a chalk line or a straightedge to mark layout lines on the subfloor. These lines serve as a guide for laying the first row of tiles perfectly straight. Ensure that the lines are square and level.
- Dry Layout: Before applying adhesive, lay out a row of tiles along the layout lines without attaching them. This dry layout allows you to make any necessary adjustments to the tile placement before they are permanently set.
Applying Adhesive and Placing Tiles
- Prepare the Adhesive: Follow the manufacturer’s instructions for mixing the tile adhesive. Proper consistency is crucial for effective adhesion. Use a notched trowel to spread the adhesive evenly over a small section of the subfloor, starting at your chosen starting point.
- Work in Small Sections: It’s best to work in manageable sections, typically 3×3 feet, to ensure that the adhesive remains workable as you lay the tiles.
- Use Tile Spacers: Insert tile spacers between the tiles to maintain consistent gaps. The size of the spacers depends on your design preference, but 1/8-inch spacers are commonly used for standard tile installations.
- Press Tiles Firmly: Press each tile firmly into the adhesive, making sure it adheres well to the subfloor. Wiggle the tile slightly to ensure a strong bond.
- Check for Level and Alignment: Use a spirit level to check that the tiles are level and that the tile edges align with your layout lines. Make any necessary adjustments by tapping the tiles gently with a rubber mallet.
- Wipe Off Excess Adhesive: As you go, use a damp sponge to wipe off any excess adhesive that may have squeezed up between the tiles. This will help keep your grout lines clean and even.
- Continue the Process: Repeat the process, working section by section, until you’ve laid all the full tiles in the area around the toilet.
- Cut and Place Tiles: For areas where full tiles won’t fit, use the cutting techniques you’ve learned earlier to trim tiles to the correct size and shape. Apply adhesive to the back of these cut tiles and place them as needed.
- Allow to Set: Once all the tiles are in place, allow the adhesive to set according to the manufacturer’s instructions. This typically takes 24 hours or as specified on the adhesive packaging.
Handling Nooks and Corners
Tiling around a toilet often involves dealing with nooks, corners, and irregular spaces. To ensure a seamless and professional finish, you’ll need to navigate these areas carefully. In this section, we’ll explore how to cut angled tiles and address curved edges to achieve a polished look.
Cutting Angled Tiles
- Measure and Mark: Begin by measuring the angle or corner where the tile needs to fit. Use a protractor or angle finder to determine the exact angle. Mark this angle on the tile you intend to cut.
- Use a Tile Cutter or Wet Saw: Depending on the thickness and material of the tile, you can use a manual tile cutter or a wet saw to make angled cuts. Position the tile in the cutter or saw, aligning it with the marked angle.
- Cut Slowly and Accurately: With the tile properly positioned, make the cut slowly and accurately along the marked angle. Be patient and avoid rushing the process to achieve a clean and precise cut.
- Test Fit: After cutting the tile, do a test fit to ensure it fits snugly into the angled or corner space. Make any necessary adjustments by recutting the tile if needed.
Dealing with Curved Edges
- Trace the Curve: When tiling around curved edges, such as pipes or rounded fixtures, use a profile gauge or a piece of cardboard to trace the curve onto the tile. This will serve as a template for your cut.
- Cut with Tile Nippers or Grinder: For small curved cuts, tile nippers are an excellent choice. Make small, incremental nips along the marked curve until you achieve the desired shape. For larger curved cuts, an angle grinder with a diamond blade can be used. Cut slowly and carefully, following the marked curve.
- Fine-Tune with Sandpaper: After making the initial cut, use sandpaper or a tile file to refine the curved edge. This will ensure a smooth and precise fit around the curved obstacle.
- Test Fit and Adjust: Always perform a test fit to confirm that the curved tile fits snugly around the obstacle. Make any final adjustments if necessary by further trimming or smoothing the edges.
- Use Tile Adhesive: Apply adhesive to the back of the curved tile and press it into place. Ensure that it adheres securely and aligns with the surrounding tiles.
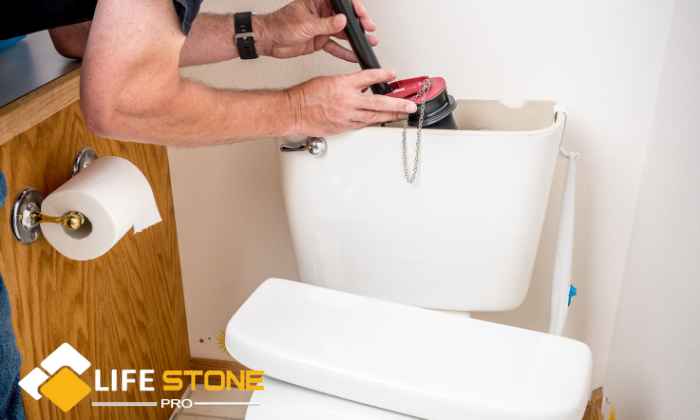
Reinstalling the Toilet
After successfully tiling around the toilet area, it’s time to reinstall the toilet to complete the project. Proper installation is crucial to ensure a watertight seal and a fully functional toilet. In this section, we’ll guide you through the steps of securing the wax ring and placing the toilet bowl.
Securing the Wax Ring
- Inspect the Flange: Begin by inspecting the toilet flange on the floor. Ensure it is clean and in good condition. Any damage or irregularities should be addressed before proceeding.
- Prepare the Wax Ring: Place the wax ring on the toilet flange, ensuring that it is centered and positioned correctly. The wax ring provides a watertight seal between the toilet and the sewer pipe.
- Lower the Toilet Bowl: Carefully lower the toilet bowl onto the wax ring, aligning the mounting bolts on the toilet base with the holes in the flange. Apply gentle downward pressure to compress the wax ring and create a secure seal.
Placing the Toilet Bowl
- Attach Washers and Nuts: Place a washer and a nut onto each of the toilet mounting bolts. Hand-tighten the nuts onto the bolts to hold the toilet bowl in place.
- Alternate Tightening: Alternate between tightening the nuts on each side of the toilet bowl to ensure even pressure and prevent the toilet from rocking or wobbling.
- Check Alignment: As you tighten the nuts, periodically check the alignment of the toilet bowl. Ensure that it is properly centered over the wax ring and that the base of the toilet is in contact with the floor.
- Avoid Over-Tightening: Be cautious not to over-tighten the nuts, as this can crack the toilet bowl. Follow the manufacturer’s guidelines for tightening torque.
- Trim Excess Bolt Length: If the mounting bolts extend beyond the nuts, use a hacksaw to trim off the excess. This will prevent interference with the toilet tank and seat installation.
- Reconnect Water Supply: Reconnect the water supply line to the toilet fill valve located on the bottom of the toilet tank. Hand-tighten the nut, and then give it a quarter-turn with pliers to ensure a snug fit.
- Turn On Water Supply: Gradually turn on the water supply valve to allow water to fill the toilet tank. Check for any leaks around the base of the toilet. If you notice any leaks, tighten the nuts slightly to eliminate them.
- Secure the Toilet Tank: If you removed the toilet tank during the tiling process, reattach it to the bowl following the manufacturer’s instructions. Tighten the tank bolts evenly to prevent any wobbling.
- Install Toilet Seat: Lastly, install the toilet seat according to the manufacturer’s instructions. Ensure it is securely fastened to the bowl.
Grouting and Sealing
With the tiles securely in place around the toilet area, the next crucial steps involve grouting and sealing. Grout not only fills the gaps between tiles but also provides stability, while a sealer offers protection against moisture and stains. In this section, we’ll guide you through filling the gaps with grout and using a sealer for added protection.
Filling the Gaps
- Select Grout: Choose a grout color that complements your tiles and fits your design preferences. There are sanded and unsanded grout options; select the one appropriate for the size of your tile gaps.
- Prepare the Grout: Follow the manufacturer’s instructions to mix the grout to the desired consistency. It should have a thick, paste-like texture.
- Apply Grout: Use a rubber grout float to spread the grout over the tile surfaces, making sure to push it into the gaps. Hold the float at a 45-degree angle and work it diagonally across the tiles to fill all joints.
- Remove Excess Grout: After applying the grout, use the edge of the grout float to scrape off excess grout from the surface of the tiles. This helps create smooth grout lines.
- Wipe Down Tiles: Once the grout has set for about 15-30 minutes (or as per the manufacturer’s instructions), use a damp sponge to gently wipe down the tiles. Rinse the sponge frequently to avoid smearing grout over the tiles. Continue this process until the tiles are clean and the grout lines are smooth.
- Final Cleaning: After 24 hours, when the grout has fully cured, perform a final cleaning with a clean, damp sponge to remove any remaining haze or residue on the tiles. Buff the tiles with a dry cloth to bring out their shine.
Using Sealer for Protection
- Select a Sealer: Choose a high-quality penetrating sealer designed for the type of tile you’ve installed. Penetrating sealers are absorbed into the tile and grout to provide protection from moisture and stains.
- Allow Grout to Cure: Ensure that the grout has fully cured before applying the sealer. This typically takes a few days to a week, depending on the manufacturer’s recommendations.
- Apply Sealer: Following the manufacturer’s instructions, use a brush or applicator to apply the sealer evenly over the grout lines and the tiled surface. Be careful not to let excess sealer pool on the tiles.
- Wipe Off Excess: After a few minutes (or as per the sealer’s instructions), use a clean, dry cloth to wipe off any excess sealer from the tiles. Pay extra attention to the grout lines.
- Multiple Coats: In some cases, you may need to apply multiple coats of sealer for maximum protection. Follow the manufacturer’s guidelines for the number of coats required.
- Allow to Dry: Let the sealer dry completely, which typically takes a few hours to a day. Avoid walking on the tiles during this time.
Final Touches
With the tiling project around your toilet complete, it’s time to add the final touches that bring everything together. Replacing toilet accessories, such as the tank lid, seat, and any other fixtures, is the next step. Once everything is in place, you can step back and admire your work.
Replacing Toilet Accessories
- Tank Lid: Carefully place the tank lid back on top of the toilet tank. Ensure that it aligns properly with the tank and is securely seated. The tank lid not only covers the tank but also adds to the overall aesthetic of the toilet.
- Toilet Seat: Reattach the toilet seat according to the manufacturer’s instructions. Typically, this involves securing the seat with bolts and nuts. Make sure it is level and fits securely on the toilet bowl.
- Toilet Handle: If you removed the toilet handle during the tiling process, reattach it to the flush valve lever inside the tank. Ensure that it is properly connected and functions smoothly.
- Toilet Paper Holder and Other Accessories: If you have any additional accessories in your bathroom, such as a toilet paper holder, towel rack, or shelves, reattach them to the walls at their designated locations. Use the appropriate mounting hardware to ensure a secure fit.
Admiring Your Work
- Step Back: After all accessories are back in place, step back and take a moment to admire your finished tiling project. The clean lines, precision cuts, and attention to detail have transformed your bathroom into a polished and inviting space.
- Functional Test: Test the toilet to ensure that it flushes properly and that there are no leaks around the base. Run both a full and partial flush to confirm that everything is functioning as it should.
- Enjoy Your Refreshed Bathroom: Your hard work and dedication have paid off, and now you can enjoy a beautifully tiled bathroom with a professional finish. Take pride in the fact that you completed this project yourself and have added value and style to your home.
- Maintenance: To keep your tiled area looking its best, follow a regular cleaning and maintenance routine. Use appropriate cleaning products for your tiles and grout, and promptly address any spills or stains.
Maintenance Tips
Maintaining your newly tiled area around the toilet is essential to preserve its appearance and functionality over time. Regular cleaning and addressing any necessary repairs will help extend the life of your tile installation. Here are some maintenance tips to keep your tiled area in pristine condition:
Keeping Your Tiled Area Clean
- Regular Cleaning Routine: Establish a routine for cleaning your bathroom tiles. Sweep or vacuum the floor regularly to remove dust and debris that can scratch the tiles.
- Tile-Specific Cleaners: Use tile-specific cleaners or a mixture of mild soap and water for routine cleaning. Avoid abrasive cleaners that can damage the tile’s surface or grout.
- Grout Maintenance: Periodically inspect the grout lines for signs of discoloration or mold growth. If you notice any issues, clean the grout with a grout cleaner or a mixture of vinegar and water. For stubborn stains, a grout brush or toothbrush can be effective.
- Avoid Harsh Chemicals: Steer clear of harsh chemicals, such as bleach or ammonia, as they can degrade grout and harm the tile finish. Stick to mild and pH-neutral cleaning solutions.
- Sealing Maintenance: Depending on the type of sealer used, reapply it as recommended by the manufacturer. Proper sealing helps prevent moisture infiltration and stains.
- Prompt Spill Cleanup: Address spills or accidents promptly to prevent staining. Blot up liquids with a clean cloth and clean the affected area with a tile-friendly cleaner.
- Regular Sweeping and Mopping: Regularly sweep and mop the bathroom floor to prevent the buildup of dirt and grime. Use a damp mop with a tile-appropriate cleaning solution.
Addressing Repairs
- Cracked or Chipped Tiles: If you notice any cracked or chipped tiles, replace them promptly to maintain the integrity of the floor. Remove the grout around the damaged tile, carefully pry out the broken piece, and install a new tile in its place.
- Loose or Cracked Grout: Address loose or cracked grout as soon as possible to prevent further damage. Remove the damaged grout, clean the space, and reapply fresh grout. Ensure the new grout is properly sealed.
- Leaking or Wobbly Toilet: If you detect any signs of a leaking toilet or wobbly base, investigate and address the issue promptly. Leaks can lead to water damage, while a wobbly toilet may cause tiles to loosen. Tighten the toilet bolts and, if necessary, replace the wax ring to create a proper seal.
- Inspect for Mold and Mildew: Regularly inspect the bathroom for mold and mildew growth, particularly in corners and grout lines. If you notice any, clean it with an appropriate mildew remover and address any underlying moisture issues.
- Recaulk as Needed: Check the caulk around the base of the toilet and at the edges where tiles meet walls or other surfaces. If the caulk is deteriorating or peeling, remove and replace it to maintain a watertight seal.
Conclusion
Tiling around a toilet is a rewarding DIY project that can transform your bathroom’s appearance and functionality. With the right tools, materials, and techniques, you can achieve a professional-looking finish that adds both style and value to your home. Here’s a recap of the key steps and considerations:
- Preparation: Gather the necessary tools and materials and ensure a clean and level surface before you begin.
- Cutting and Placing Tiles: Choose the right tiles, cut them accurately, and lay them in place, paying attention to angles, curves, and precise fits.
- Reinstalling the Toilet: Secure the wax ring and carefully place the toilet bowl, ensuring a watertight seal. Reattach the tank, toilet seat, and other accessories.
- Grouting and Sealing: Fill gaps with grout and use a suitable sealer to protect your tiles from moisture and stains.
- Cleaning Up and Inspecting: Remove excess adhesive and grout, and thoroughly inspect your work for imperfections. Make necessary corrections for a flawless finish.
- Final Touches: Replace toilet accessories and admire your completed project. Enjoy the enhanced beauty and functionality of your bathroom.
- Maintenance: Establish a cleaning routine, use appropriate cleaning products, and address repairs promptly to keep your tiled area looking its best.
You must get in contact with us if you need this kind of services.
FAQs
Can I tile around a toilet without removing it?
Yes, it’s possible to tile around a toilet without removing it. This is known as a “toilet flange extension.” It involves raising the toilet slightly by adding a flange extender, allowing you to tile underneath without removing the toilet. However, this method requires careful measurement and sealing to avoid leaks.
How long does it take to tile around a toilet?
The time it takes to tile around a toilet depends on various factors, including the size of the area, your experience, and the complexity of the project. On average, tiling around a toilet can take one to two days, including drying times for adhesive and grout.
Can I use any type of tile for tiling around a toilet?
You can use various types of tiles for tiling around a toilet, including ceramic, porcelain, natural stone, and vinyl. The choice depends on your preferences, budget, and the specific requirements of your bathroom. Ensure that the selected tile is suitable for floor applications and is water-resistant.
How do I maintain the grout between tiles?
Maintaining grout between tiles involves regular cleaning and resealing as needed. Clean grout with a mild cleaner and a grout brush. Reseal grout lines every 1-2 years or as recommended by the manufacturer to prevent moisture infiltration and staining.
What should I do if I notice a leak around the toilet base after tiling?
If you notice a leak around the toilet base, it’s crucial to address it promptly. Turn off the water supply, remove the toilet, and inspect the wax ring. Replace the wax ring if damaged. Ensure the flange is in good condition and securely bolt the toilet back in place. Test for leaks after reinstallation.
Can I install underfloor heating under the tiles around the toilet?
Yes, you can install underfloor heating under the tiles around the toilet to keep the area warm and comfortable. Ensure that you follow the manufacturer’s instructions for installation and avoid damaging the heating elements during tile placement.
What tools do I need for tiling around a toilet?
Common tools for tiling around a toilet include a tile cutter, wet saw, grout float, notched trowel, level, measuring tape, rubber mallet, and safety gear like gloves and goggles. Additionally, you may need a wax ring, grout, adhesive, and spacers.
Our Services
Our Recent Post

Black And White Granite Countertops: Which Is Right For You?
Black And White Granite Countertops: Which Is Right For You?...
Read More
Elevate Your Countertop Kitchen Decor with Marble or Granite
Elevate Your Countertop Kitchen Decor with Marble or Granite When...
Read More
Tile And Grout Cleaning Services
Tile and grout cleaning services by Stone Sealer Restoration -...
Read More